Video Background Removal using Python with Interactive Deployment.
Image segmentation is a process of separating multiple image segments from an image.

The most common usage of image segmentation is in Video Conferencing Apps like Zoom, Google meets, Teams, etc. where a person can add various background effects to their videos.
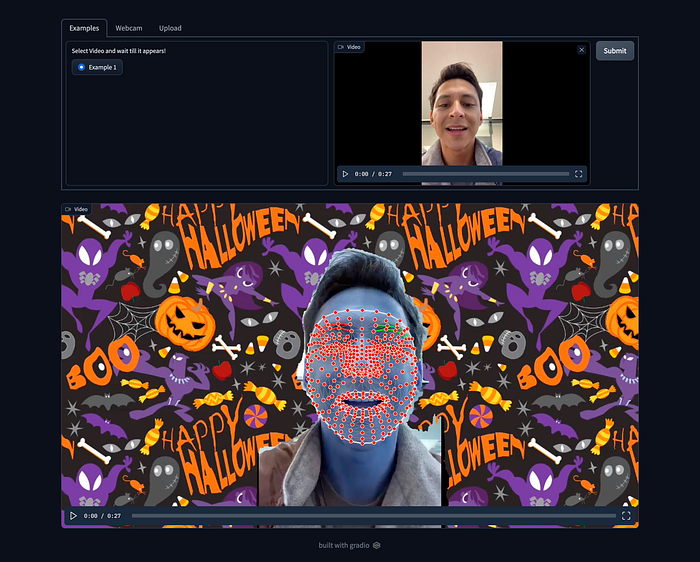
Today we are going to develop a model which will segment a person from the background while replacing the background with an image. The model will be deployed on TrueFoundry for you all to try.
Key takeaways from this blog
- Using Mediapipe for face segmentation and background removal.
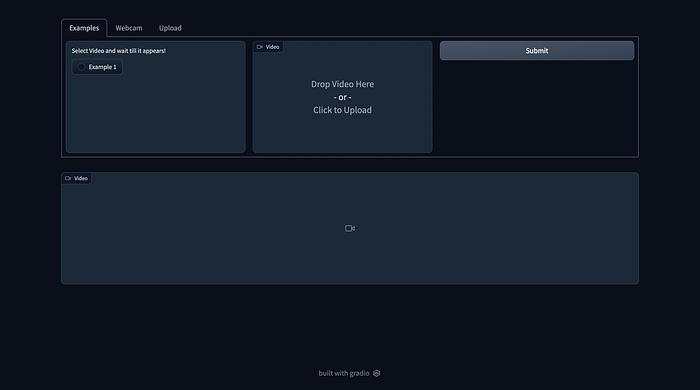
- Deploying the model in a Gradio app in which we can upload any video or use a webcam for video input.
- The model will be deployed using TrueFoundry
Let’s begin
We will start by installing the required libraries.
Installation
pip install mediapipe mlfoundry servicefoundry gradioImporting Libraries
import cv2
import mediapipe as mp
import numpy as np
from IPython.display import HTML
from base64 import b64encode
import numpy as np
import cv2
import matplotlib.pyplot as plt
import mlfoundry as mlf
import warnings
import servicefoundry.core as sfy
from servicefoundry import Build, PythonBuild, Service, Resources
warnings.simplefilter(action='ignore', category=Warning)
Previewing Test Video
Previewing Video on Kaggle is not there by default therefore we are going to do a workaround that will embed the video into the page source
def play(filename):
    html = ''
    video = open(filename,'rb').read()
    src = 'data:video/mp4;base64,' + b64encode(video).decode()
    html += '<video width=1000 controls autoplay loop><source src="%s" type="video/mp4"></video>' % src
    return HTML(html)play('../input/videos-for-segmentation/Dance - 32938.mp4')
Creating Mediapipe Objects
mp_drawing = mp.solutions.drawing_utils
mp_drawing_styles = mp.solutions.drawing_styles
mp_face_mesh = mp.solutions.face_mesh
mp_selfie_segmentation = mp.solutions.selfie_segmentation
mp_objectron = mp.solutions.objectron
Importing Video using CV2
cap = cv2.VideoCapture('../input/videos-for-segmentation/Dance - 32938.mp4')Finalizing Frame widths
frame_width = int(cap.get(3))
frame_height = int(cap.get(4))

size = (frame_width, frame_height)
result = cv2.VideoWriter('result.mp4',
                         cv2.VideoWriter_fourcc(*'VP90'),
                         30, size)
tik = 0
Segmentation Object
Face mesh Object
Visualizing result
play('./result.mp4')Now our model is ready, we will deploy the model
Login to TrueFoundry
Using our API Key we are going to log in to the platform.
sfy.login(api_key)Writing Deployment Script
In this script, we will download the test video and background from Drive and then use our model on those videos
We are going to write the below script to deploy.py using the “writefile” magic function.
Gathering Requirements
requirements = sfy.gather_requirements("deploy.py")
requirements['opencv-python-headless'] = '4.6.0.66'
requirements['chardet'] = '3.0.4'
requirements['jinja2'] = '3.1.2'
reqs = []
for i, j in enumerate(requirements):
    reqs.append('{}=={}'.format(j, requirements[j]))
with open('requirements.txt', 'w') as f:
    for line in reqs:
        f.write(line)
        f.write('\n')
Creating Dockerfile
We are going to use the OpenCV docker image by Jjanzic and then deploy our code.
%%writefile Dockerfile'''FROM jjanzic/docker-python3-opencv:opencv-4.0.0
COPY ./requirements.txt /tmp/
RUN pip install -U pip && pip install -r /tmp/requirements.txt
COPY . ./app
WORKDIR app
ENTRYPOINT python deploy.py'''
The directory structure should look like this.
Root
— deploy.py
— requirements.txt
— Dockerfile
Creating Service for deploying Model
Here, we will use DockerFileBuild which will use the Dockerfile for image creation and deployment.
We will limit the memory to 2.5 GB and CPU to 3.5 Cores for the model using Resources Class.
service = Service(
    name="face-service-final",
    image=Build(
        build_spec=DockerFileBuild(),
    ),
    ports=[{"port": 8080}],
    resources=Resources(memory_limit="2500",
memory_request="2000",cpu_request=3,
        cpu_limit=3.5,),
)
service.deploy(workspace_fqn=workspace)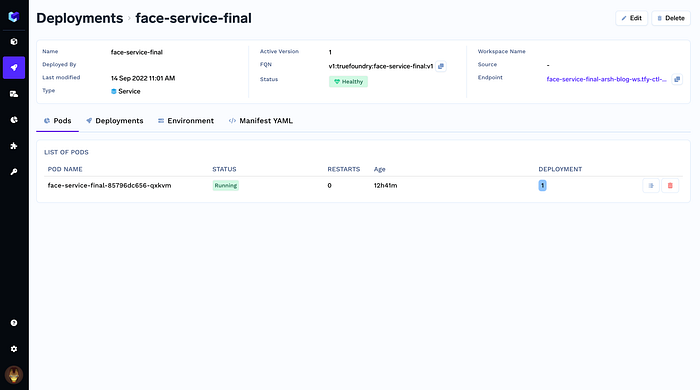
The model is Deployed here: https://face-service-final-arsh-dev.tfy-ctl-euwe1-develop.develop.truefoundry.tech/
Code:
The above Code is also present in this Kaggle Notebook
References:
- TrueFoundry: https://truefoundry.com/
- Kaggle Notebook: https://www.kaggle.com/d4rklucif3r/image-segmentation-deployment